You can set up your project to maintain multiple concurrent versions of documents or API description files. It is possible to apply versioning to single files or sets of files in the same location. You can do this by creating version subfolders for each version of content you want to include.
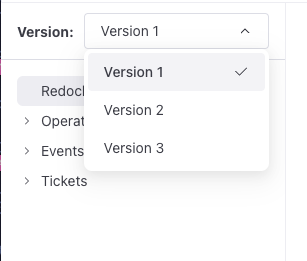
When you access content inside a version subfolder, a version picker is displayed at the top of the sidebar. The version picker enables users to select which version of content to display. The sidebar reflects the changes in files and filenames when you switch between versions.
You can use this feature to: keep past versions of API descriptions for backwards compatibility, document experimental versions of software, or maintain release notes separate for each version.
To configure your project to include multiple versions, complete the following tasks:
- Create version subfolders
- (Optional) Customize the sidebar containing versioned content
- (Optional) Customize the version picker
Make sure you have the following before you begin:
- a
redocly.yamlconfiguration file - versioned content
To include versioned content with a version picker, you must organize your content into version subfolders.
To organize your content into version subfolders:
- Create a main content folder.
- Create subfolders for the different versions within the main content folder.
Version subfolder names must start with the "@" symbol, but otherwise can be any string, with or without numbers. For example,@latest,@1.0.0,@rc1are all valid.
You can add as many version subfolders as you need, but nesting them is not supported. - Place the files for the different versions in their specified folders.
After building your project, when you access versioned content, the sidebar displays the version picker, enabling you to switch between content versions.
The following example includes versions 1.0, 2.0, and 3.0 of the museum_api, and the legacy and latest versions of the customer_api:
├──museum_api/
│   ├──@1.0/
│   │   ├──index.md
│   │   ├──museum.yaml
│   │   └──overview.md
│   ├──@2.0/
│   │   ├──index.md
│   │   └──museum.yaml
│   └──@3.0/
│       ├──images/
│       │   └──diagram.png
│       ├──index.md
│       ├──readme.md
│       └──museum.yaml
├──customer_api/
│   ├──@latest/
│   │   ├──index.md
│   │   └──payments.yaml
│   ├──@legacy/
│   │   ├──index.md
│   │   ├──payments.yaml
│   │   └──readme.md
│   └──versions.yaml
├──index.md
└──sidebars.yaml
The museum_api versions will appear in the version picker in the same order as the version subfolders in the file tree: 1.0, then 2.0, and finally 3.0. The version opened by default will be the the last version, in this case: 3.0.
Since in customer_api the legacy version appears second, it would also be the default version. To make the latest version appear at the bottom of the list and be the default version, a versions.yaml file with the desired configuration was added to the customer_api folder.
Another example shows the public beta version of payments_api:
├──payments_api/
│   └──@public_beta/
│       ├──index.md
│       └──payments.yaml
├──index.md
└──sidebars.yaml
In this case payments_api contains only one version subfolder. This configuration is enough to enable the version picker that displays one available version: public_beta. You can use a similar structure to prepare your project for upcoming versions of content.
After creating the structure for your versioned content, you can create a custom sidebar configuration for this structure. Depending on your preferences and the contents of your project, you can place sidebars.yaml in the root directory of your project, or in the same folder as versioned content folders. For example, if you have more than one collection of versioned content, you might want to create a separate sidebar for each collection.
For more information about customizing sidebars, see: Sidebar configuration.
When you switch between versions, the sidebar updates according to the content of version subfolders, including sidebar item labels and the number of files in a version subfolder.
If you want to create a sidebar for versioned folders without further customizations, you can add the entire parent folder of versioned content to a sidebars.yaml file. Using this method, any files you add or modify later, automatically update sidebar links when you build the project. The directory option sorts the links in the natural order.
To customize a sidebar using the directory option:
- Add a
directoryoption for each folder containing versioned content in yoursidebars.yamlfile, as in the following example:sidebars.yaml- page: index.md label: Main page - directory: - directory: - As the values for the
directorykeys, add paths to the folders containing versioned content, as in the following example:sidebars.yaml- page: index.md label: Main page - directory: /museum_api - directory: /customer_api
This configuration modifies the sidebar to include links to all content files in the museum_api folder followed by files in customer_api. The titles or the first headings of the files are used for the sidebar labels.
If you want to control the sidebar with a single file that determines the order of the links and the labels, create a sidebars.yaml file in the folder containing your version subfolders and add links to the individual files inside the version subfolders.
To add a single sidebar for all version folders:
- In your project create a
sidebars.yamlfile in a folder a that contains your versioned content, as in the following example:Sample file structure for multiple folders with versioned content and a single sidebars file├──my-awesome-docs/ │ ├──museum_api/ │ │ ├──@1.0/ │ │ ├──@2.0/ │ │ └──@3.0/ │ └──customer_api/ │ ├──@latest/ │ └──@legacy/ └──sidebars.yaml - Add a
pageoption with the value of a file path for each content file in each version subfolder in yoursidebars.yamlfile, as in the following example:sidebars.yaml- page: index.md label: Main page - page: /museum_api/@1.0/index.md - page: /museum_api/@1.0/museum.yaml - page: /museum_api/@1.0/overview.md - page: /museum_api/@2.0/index.md - page: /museum_api/@2.0/museum.yaml - page: /museum_api/@3.0/index.md - page: /museum_api/@3.0/museum.yaml - page: /museum_api/@3.0/readme.md - page: /customer_api/@legacy/index.md - page: /customer_api/@legacy/payments.yaml - page: /customer_api/@legacy/readme.md - page: /customer_api/@latest/index.md - page: /customer_api/@latest/payments.yaml - (Optional) You can arrange the
pageoptions into groups so that each group appears under a single label.sidebars.yaml- page: index.md label: Main page - group: Museum API items: - page: /museum_api/@1.0/index.md - page: /museum_api/@1.0/museum.yaml - page: /museum_api/@1.0/overview.md - page: /museum_api/@2.0/index.md - page: /museum_api/@2.0/museum.yaml - page: /museum_api/@3.0/index.md - page: /museum_api/@3.0/museum.yaml - page: /museum_api/@3.0/readme.md - group: Customer API items: - page: /customer_api/@legacy/index.md - page: /customer_api/@legacy/payments.yaml - page: /customer_api/@legacy/readme.md - page: /customer_api/@latest/index.md - page: /customer_api/@latest/payments.yaml
This configuration modifies the sidebar by adding two groups, Museum API and Customer API. Within each group are multiple versions of files. When you first access your project, the sidebar displays only the links to files from the versions: 3.0 and legacy respectively. These versions are the default versions, as they are the lowest on the alphanumeric ascending order. To set custom default versions, see Customize the version picker.
To prevent the sidebar at the root of your project from becoming overly long, you can maintain separate sidebars.yaml files for your versioned content in their respective folders. This approach can be especially useful when your content has a large number of versions.
To add a dedicated sidebars.yaml for each version folder:
- Add a
sidebars.yamlfile to each folder containing versioned content in your project, as in the following example:Sample file structure for multiple folders with versioned content├──museum_api/ │ ├──@1.0/ │ │ ├──index.md │ │ ├──museum.yaml │ │ └──overview.md │ ├──@2.0/ │ │ ├──index.md │ │ └──museum.yaml │ ├──@3.0/ │ │ ├──images/ │ │ │ └──diagram.png │ │ ├──index.md │ │ ├──readme.md │ │ └──museum.yaml │ └──museum.sidebars.yaml ├──customer_api/ │ ├──@latest/ │ │ ├──index.md │ │ └──payments.yaml │ ├──@legacy/ │ │ ├──index.md │ │ ├──payments.yaml │ │ └──readme.md │ ├──versions.yaml │ └──customer.sidebars.yaml ├──index.md └──sidebars.yaml - Add a
pageoption with a value of the file path for each content file in each version subfolder in eachsidebars.yamlfile, as in the following example:museum.sidebars.yaml- page: /@1.0/index.md label: Museum API - page: /@1.0/museum.yaml - page: /@1.0/overview.md - page: /@2.0/index.md label: Museum API - page: /@2.0/museum.yaml - page: /@3.0/index.md label: Museum API - page: /@3.0/museum.yaml - page: /@3.0/readme.md - In the
sidebars.yamlfile at the root of your project, add references to the sidebar files for versioned content, as in the following example:sidebars.yaml- page: index.md label: Main page - $ref: /museum_api/sidebars.yaml - $ref: /customer_api/sidebars.yaml
In the built project, the sidebar combines the referenced sidebars.yaml files and displays links to the default version of the content.
By default, the order of versions in the version picker is the same as the folder structure in the project, in the alphanumeric ascending order. The version that opens when you navigate to versioned file, is by default the version last in the order.
You can customize which versions appear in the version picker, the order of the versions, and the version that opens by default.
For more information on version picker configuration, see the Versions configuration options below.
To specify the default version and choose which versions to display, create a versions.yaml file on the same level as your version subfolders:
default: latest
versions:
  - version: legacy
    name: Legacy version
  - version: latest
name: Latest versiondefault- The version displayed first when the page loads. Must match a version folder name (without the@prefix)versions- Array of version objects specifying which versions to include and their display namesversion- Must match the version subfolder name (without the@prefix)name- Display name shown in the version picker. If not provided, uses the folder name
If you don't provide a name, the version folder name (without @) is used instead. As an example, let's assume this file structure:
my_awesome_docs/
└──customer_api/
├──@latest/
│   ├──index.md
│   └──museum.yaml
├──@legacy/
|   ├──index.md
|   ├──museum.yaml
|   └──readme.md
├──@demo/
│   ├──index.md
│   └──museum.yaml
└──versions.yaml
For this structure, we created a versions.yaml file with two versions: legacy and latest, specifying latest as the default. The demo version was purposefully not included.
default: latest
versions:
  - version: legacy
    name: Legacy version
  - version: latest
name: Latest versionYou can configure your project to display the version picker on all pages, even those that do not have defined versions.
To display the version picker for all content use the following configuration in your redocly.yaml file:
versionPicker:
  showForUnversioned: true
For pages that do not have multiple version, the version picker is inactive and displays All versions.
To work with versioned content in your React pages, you can use Redocly's version management hooks usePageVersions and usePageActiveVersion. These hooks let you access the current version information and manage version-specific content in your components.
The usePageVersions hook returns an array of version objects with the following structure:
| Property | Type | Description |
|---|---|---|
| active | boolean | Indicates if this version is currently active |
| default | boolean | Indicates if this is the default version |
| label | string | Display label for the version |
| version | string | Version identifier |
Example usage:
import { usePageVersions } from '@redocly/theme/core/hooks';

function VersionedPage() {
  const versions = usePageVersions();

  return (
    <div>
      {versions.map(version => (
        <div key={version.version}>
          {version.label} {version.active && '(Active)'}
        </div>
      ))}
    </div>
  );
}The useActivePageVersion hook returns the currently active version identifier as a string, or undefined if no version is active.
Example usage:
import { useActivePageVersion } from '@redocly/theme/core/hooks';

function VersionedPage() {
  const activeVersion = useActivePageVersion();

  return (
    <div>
      <h1>Current Version: {activeVersion}</h1>
      {/* Version-specific content */}
    </div>
  );
}If you want to specify the default version and which versions to include in your project, create a versions.yaml file on the same level as your version folders.
| Option | Type | Description |
|---|---|---|
| default | string | The version displayed first when the page is loaded. Must match the name of the version folder, excluding the @ prefix. If not defined, it is the last version in the versions object. Without a versions.yaml file, the default version is the highest version in the alphanumeric ascending order. |
| versions | Array of Version object | This option specifies the version subfolders to include, their display names, and the order. If not used, all version subfolders in the same location are included in the version picker. |
| Option | Type | Description |
|---|---|---|
| version | string | This option is the name of the version. Must match the name of the version subfolder, excluding the @ prefix. |
| name | string | The name for a version displayed in the version picker. If not defined, uses the version subfolder name, excluding the @ prefix. |
The following are examples of versions.yaml files:
The following example contains two versions: v1.0, and v1.1. The version picker displays Version 1.0 and Version 1.1 as the labels for these versions. As v1.0 is the default version, when you navigate to your versioned content, your project displays files from @v1.0 version subfolder.
default: v1.0
versions:
  - version: v1.0
    name: Version 1.0
  - version: v1.1
    name: Version 1.1
The following example contains three versions: 1.0, 2.0, and 2.3. Since the names contain only numbers, the names were placed inside single quotations to match the required string type for these values. The version picker displays 1.0, 2.0, and 2.3. The default version is not defined in this file, so the project displays files from the version subfolder with the highest value. In this case, it is @2.3.
versions:
  - version: '1.0'
  - version: '2.0'
- version: '2.3'- Sidebar configuration - Configure navigation structures and sidebar organization for versioned content with detailed syntax and options reference