The Webview tab in the Editor displays a preview for each branch. Any time you make a change in the Editor, the change is reflected in the Webview. The Webview tab opens alongside your file tabs in the editor pane, so you can move it, resize its group, or close it like any other tab. You can disable auto-sync, view different screen sizes, reload the page or restart, and navigate the pages.

There is a difference between the Webview and the preview deployment. The Webview displays uncommitted changes while the preview deployment triggers when you make a commit to a branch with an open pull request.
If the Webview tab is already open in the editor pane, click the tab to focus it. If it is closed, open it in any of the following ways:
- Click the More actions icon on the right side of the tabs header and select Open Webview.
- Use the keyboard shortcut
⌃ Ctrl+⌥ Opt+Won macOS orCtrl+Alt+Won Windows. - When a tab group is empty, click the Webview shortcut shown under Dev tools.
If the Webview tab is already open elsewhere in the pane, these actions activate the existing tab instead of creating a duplicate.
To close the Webview tab, click the close icon on its tab header, or right-click the tab and select Close. To give the editor more space, you can also collapse the file tree pane.
If you want to see how a page renders on different screen sizes, click the Toggle device view icon.

You can select from the following preset sizes:
- Mobile (320x675)
- Tablet (1024x765)
- Desktop (1400x800)
- Desktop HD (1920x1080)
You can also enter specific length and width pixel sizes and click and drag the sides of the Webview to expand or contract the sides.
To see a full screen version of Webview in a new tab or a new window, click the Open in a new window icon.

Click the More actions icon to either do a full restart of Webview or disable auto-sync.

To completely restart the server, click the More actions icon and select Full Restart.
When you update the package.json file in the Editor, the Webview re-installs dependencies and restarts automatically.
When you disable auto-sync, the Webview does not update based on the page you are on in the Editor. To disable auto-sync, you can click the More actions icon and select Disable auto-sync.
To turn auto-sync back on, click the More actions icon and select Enable auto-sync.
To reload the page you are on in the Editor, click the Reload icon.

You can use the back and forward arrow icons to navigate pages in the Editor.

The back and forward arrow icons consider page view history, which starts over when the Webview is reloaded or restarted.
The Webview tab and its full screen version include a status bar at the bottom edge of the screen. This status bar displays the number of pages in your project and project build errors.
You can drag the status bar along the bottom edge of the Webview to move it out of the way.
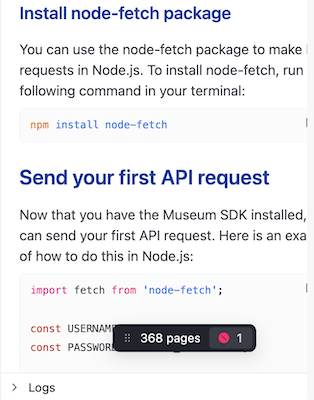
The project status bar in the Webview tab displays the current number of pages in your project. This number counts towards your page budget.
The page count refreshes as you add or remove content.
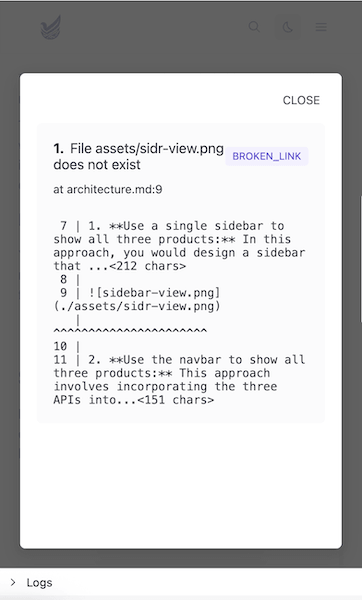
The project status bar displays the number of errors found during Webview builds. When there are no errors detected in your project, the left side of the status bar displays a tick icon and the number 0. If your project contains issues like broken links, the left side of the status bar displays a crossed circle icon and the number or errors.
Click the left side of the status bar to expand a pane with the descriptions and locations of errors in your project files. The number of errors and the content of the errors pane updates as you make changes to the project.
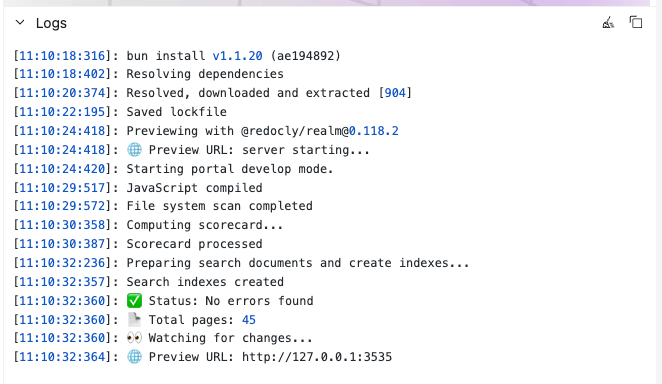
You can monitor and manage Webview logs using the Logs panel at the bottom of the screen. Logs automatically appear when changes are made to the project or when the Webview generates new output. The Logs panel automatically scrolls to show the most recent logs.
In the Logs panel you can:
- Expand and collapse the panel

- Clear logs: remove all current logs

- Copy logs: copy all logs to clipboard

- Use the editor - Learn to edit content in Reunite's integrated editor with syntax highlighting and collaborative features
- Test API functions - Send requests to API functions from Replay while you work in the editor
- Use previews - Access deployment previews to review changes before publishing to your live documentation site