Reference the user interface (UI) of pages in Reunite's project workspace. Learn about the various ways you can utilize the interface controls.
Some UI elements are available only for users with specific organization and project roles.
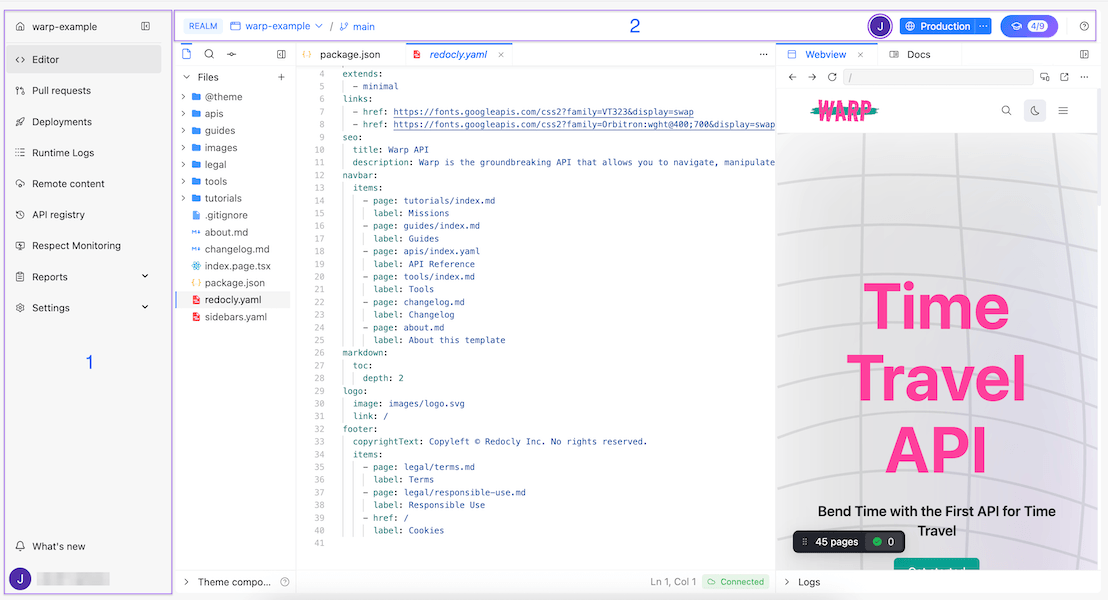
All project workspace pages have:
- (1) navigation pane
- (2) top bar
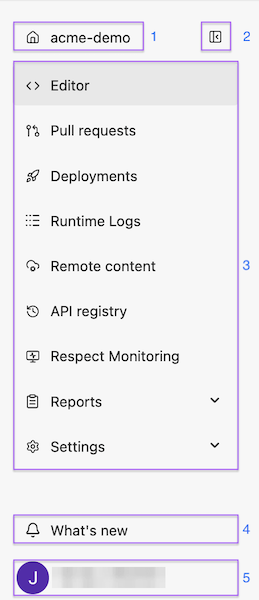
Use the navigation pane to:
- (1) access the organizations and projects menu
- (2) collapse the navigation pane
- (3) switch between Reunite workspace pages
- (4) view the latest product announcements
- (5) access the user profile menu
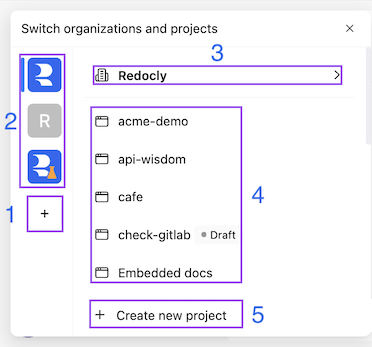
Use the organization and projects menu to:
- (1) create a new organization
- (2) switch between organizations
- (3) return to the organization's Projects page
- (4) switch between projects
- (5) create a new project
The Editor page is the part of Reunite's project workspace where you add, edit, and manage the content of your project. The page has two main areas:
- the file tree pane
- the editor pane, which contains both file tabs and the utility pane (Webview, Documentation and Replay tabs)
To best suit your experience, you can resize the file tree pane, collapse it, and reorganize the editor pane by splitting and rearranging tabs.
The file tree pane has three tabs:
- files tab with Theme components pane
- search tab
- commit tab with History pane
The files tab displays the file tree of your project, including remote files. Use this tab to add, modify, or delete files, as well as eject your project's theme components.
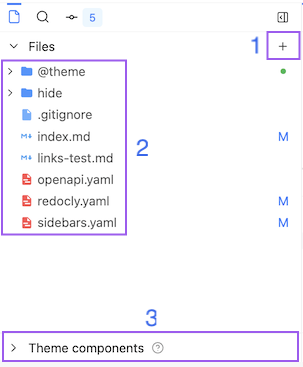
In this tab you can:
- (1) add new content:
- (2) manage files and folders
- (3) browse, eject, and customize theme components
Use the search tab to lookup text or files in your project.
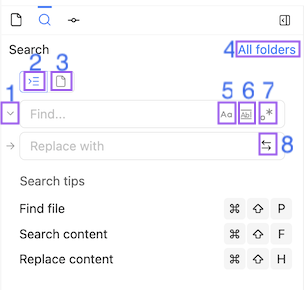
In this tab you can:
- (1) expand or collapse the Replace with field
- (2) search file content
- (3) find files by name
- (4) filter search results by folder
- (5) toggle case matching
- (6) toggle whole word search
- (7) toggle regex search
- (8) replace all results
The commit tab lists all changes to files since the last commit. Use this tab to commit changes, open pull requests, revert uncommitted changes to files, and view the commit history.
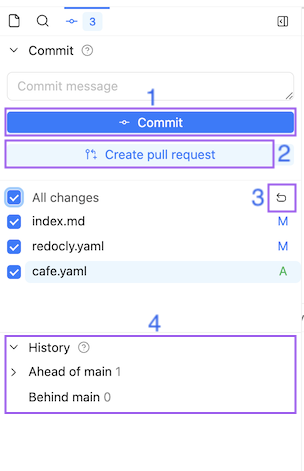
In this tab you can:
- (1) commit latest changes to the current branch
- (2) create a pull request
- (3) revert changes to selected files
- (4) view commit history relative to the main branch of the project
The editor contains tabs that display the content you are working with. Every file opens as a tab, and utility views such as the Webview live preview or Redocly documentation open as tabs in the same pane. You can rearrange, split, and close any of these tabs to build the layout that best fits your workflow.
Each tab group header includes a + icon that opens the start tab (labeled New tab).
With the start tab you can:
- open recent files
- search files by name
- open utility tabs from the Tools section
File tabs display the content of files from your project. When you single-click a file in the file tree, the file opens in a preview tab with its name shown in italics. If you single-click another file, the new file replaces the preview tab. To keep a file open, double-click its tab or start editing the file. This converts the preview tab into a regular tab.
By default, the utility pane is located on the right side of the screen and has three utility tabs open:
- Webview: Displays a live preview of the opened Markdown or API description file. See Use the Webview for details.
- Documentation: Displays Realm documentation with full capabilities of a Redocly project.
- Replay: Opens the Replay console, enabling you to test API requests and API functions in your project.
To open a utility tab, either:
- Click the More actions icon on the right side of the tabs header and select Open Webview or Open Documentation.
- Use the keyboard shortcut for the tab you want. See the keyboard shortcuts reference for the full list.
- Open a start tab and select a tool from the Tools section.
If a utility tab is already open, triggering the open action activates the existing tab instead of creating a duplicate.
You can also use the utility pane to open project files in a side-by-side layout.
The Webview live preview tab renders the currently open Markdown or API description file as it would appear in a published project.
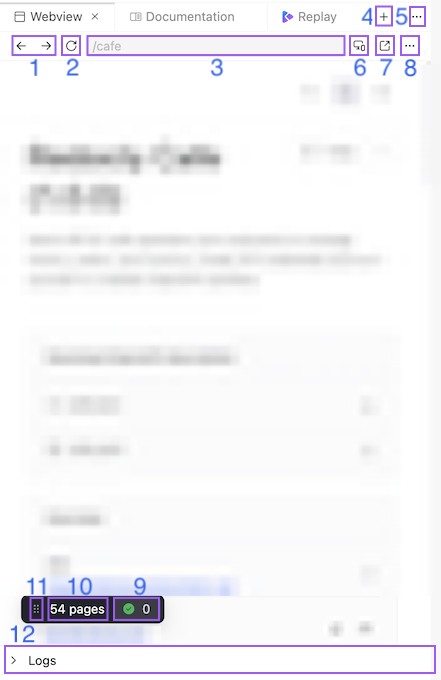
In this tab you can:
- (1) navigate to previously opened pages
- (2) reload webview
- (3) view the slug to the file displayed in the webview
- (4) open a utility tab, or search in project files
- (5) use the editor's More actions menu to: manage editor tabs
- (6) switch the view between screen sizes
- (7) open webview in a new browser window or tab
- (8) use the utility pane's More actions menu to:
- (9) display webview build validation errors
- (10) display the number of pages in the project
- (11) click and drag the status bar to move it out of the way
- (12) view webview build logs
The Documentation tab displays Realm documentation with full capabilities of a Redocly project.
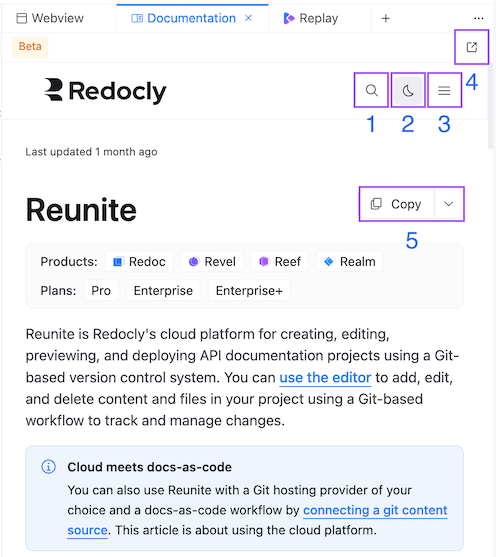
In this tab you can:
- (1) search the content
- (2) navigate the pages
- (3) change the color mode
- (4) open the displayed page in a new window or tab
- (5) interact with pages
The Replay tab displays the Replay console you can use to test API functions in your project. The console is available after the Webview completes building your project.
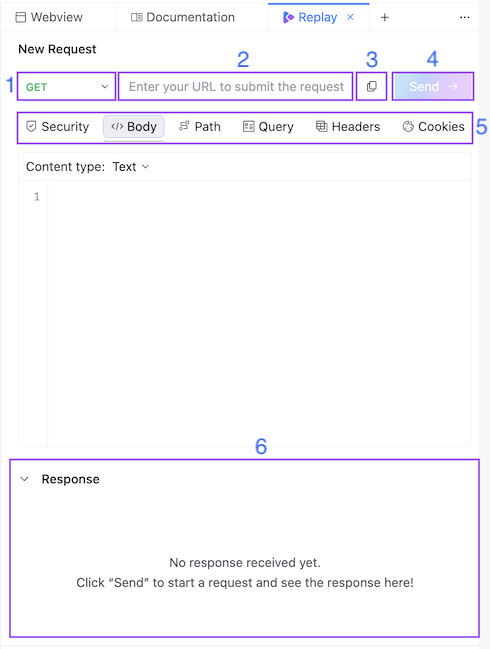
In this tab you can:
- (1) select a request method
- (2) enter request URL
- (3) copy request URL
- (4) send the request
- (5) edit request parameters
- (6) view the response
Right-click any tab to open the tab context menu and choose one of the following actions:
- Close - closes the tab.
- Close others - closes every tab in the same group other than the active tab.
- Close to the right - closes the tabs to the right of the current tab in the same group.
- Close unchanged - closes every file tab in the group that has no uncommitted changes.
- Close all - closes every tab in the group.
- Copy path - copies the file path of the tab to the clipboard (available for file tabs only).
- Split right, Split left, Split up, Split down - moves the tab into a new group positioned relative to the current group.
You can also drag a tab by its header and drop it on the edges or center of another group to move it, or onto the middle to create a new group.
The More actions icon on the right side of each tabs header provides group-level shortcuts to:
- Close all or close unchanged tabs in that group.
- Reset the editor to the default layout with an empty tab group in the center of the screen, and a utility tab group on the right.
- Open the Webview, Documentation, or Replay utility tab.
- Toggle word wrap for the active editor tab.
- Reunite - Learn about Reunite's features
- Reunite user profile menu - Step-by-step instructions setting up notifications, color mode, and a Git provider account
- Use the Webview - View live previews of your content changes while editing for immediate visual feedback
- Use the editor - Learn to edit content in Reunite's integrated editor with syntax highlighting and collaborative features