Redocly projects include user interface (UI) elements with text labels. These labels can either be the default generated labels or configured labels added by users when defining elements such as the sidebars or the footer.
To localize UI labels, first you need to add keys to the user-defined UI elements, then copy them to a translations.yaml file and add the translations to each key. A translations.yaml file contains translation keys and localized labels for a specific language. These key-value pairs are used to translate different types of content, including the following:
- User-defined UI elements: Define and translate project labels by updating the
sidebars.yamlorredocly.yamlfiles with the translation keys and including atranslations.yamlfile in each locale folder with the language specific key-value pairs. - Base UI component labels: Translate base UI component labels by including a
translations.yamlfile in each locale folder with the language specific key-value pairs. - Content on React pages: Define and translate content on React pages by creating the translation keys on the React page and including a
translations.yamlfile in each locale folder with the language specific key-value pairs.
Base UI component labels include predefined keys; however, you must create keys for all other types of content.
Make sure you have the following:
- a project with an
@l10nfolder containing your translated content organized into locales. See l10n configuration for setup information and Add translated content for content localization.
Redocly provides default translations for the most popular languages. See Supported default translations for a list of supported languages.
Each label from the components that come bundled with the project has a predefined translation key assigned to it. See l10n translation keys for a list of predefined translation keys available.
To customize default translations or add new translations for the base UI components:
- If you haven't already, add a
translations.yamlfile to each of your locale folders. - Copy and paste the l10n translation keys into each
translations.yamlfile in the locale folders. - Add the translated values for the translation keys.
For example, to translate the login button text to Spanish, use the following key value pair in your translations.yaml file in the es-ES subfolder:
userMenu.login: accesoSome UI elements in your project support customizable configurations and can contain user-defined text, such as labels and titles. To be able to localize the text components of these elements, you must first create translation keys in their configuration files.
The user-defined UI elements that use translation keys are:
Translation keys for most user-defined UI elements are included in the redocly.yaml configuration files. Sidebars are an exception and have their configuration in the sidebars.yaml files.
To add translation keys to user-defined elements, add translation key options to elements in your redocly.yaml or sidebars.yaml files. For more information on the types of keys a UI element uses, see Configure Redocly and navigate to the relevant reference documentation.
The following example shows a complete redocly.yaml file with translation keys configured for navbar and footer elements:
navbar:
  items:
    - label: Home
      page: /
    - group: Products
      groupTranslationKey: navbar.products.label
      items:
        - page: /redocly-museum/
          label: Redocly Museum API
footer:
  items:
    - groupTranslationKey: footer.legal.label
      items:
        - label: Terms of Use
          labelTranslationKey: footer.legal.termsOfUse
          href: '/terms-of-use/'
The following example is a sidebar with translation keys added to each group, label, and separator:
    - group: Getting Started
      groupTranslationKey: sidebar.gettingStarted
      items:
        - separator: My separators
          separatorTranslationKey: sidebar.gettingStarted.separator
        - group: Introduction
          groupTranslationKey: sidebar.gettingStarted.introduction
          separatorLine: true
          items:
            - page: index.md
              label: First steps
              labelTranslationKey: sidebar.gettingStarted.first-steps
    - page: overview.md
      label: Installation
labelTranslationKey: sidebar.installationTo add translations for your configured translation keys:
- Add a
translations.yamlfile to each of your locale folders (if you haven't already) - Find the options that end with
TranslationKeyin your project'sredocly.yamlandsidebars.yamlfiles (such asgroupTranslationKey,labelTranslationKey,titleTranslationKey,descriptionTranslationKey,separatorTranslationKey, andmissingCategoryNameTranslationKey) - Add the translation key values with their translated text to each locale's
translations.yamlfile
The following example shows a complete translations.yaml file for Spanish translations:
navbar.home: página de inicio
navbar.products.label: productos
navbar.products.redocly-museum: Redocly Museo
footer.legal.label: Legal
footer.legal.termsOfUse: Condiciones de uso
sidebar.gettingStarted: Empezando
sidebar.gettingStarted.separator: Mis separadores
sidebar.gettingStarted.introduction: Introducción
sidebar.gettingStarted.first-steps: Primeros pasos
sidebar.installation: InstalaciónYou must create translations keys in the React file before you can assign it a language specific value in the translations.yaml file.
To translate content in React pages, use the useTranslate hook by extracting it from useThemeHooks. This hook returns a translate function which accepts the following two arguments:
- a translation key
- a default value which is used when a translation is missing
The following is an example of a React page with a translated heading 1:
import React from 'react';

import { useThemeHooks } from '@redocly/theme/core/hooks';

export default function () {
  const { useTranslate } = useThemeHooks();
  const { translate } = useTranslate();
  return (
    <div>
      <h1>{translate('react-page.heading', 'This is default fallback text!')}</h1>
    </div>
  );
}The react-page.heading is an arbitrary name. You can name your translation keys however you want.
The heading on the example React page includes the same text for all languages by default, "This is default fallback text!". To translate it to different languages, add the key react-page.heading to the respective translations.yaml files, as in the following example for a Spanish translation:
react-page.heading: ¡Este es un texto traducido!Redocly projects come with a set of built-in UI labels in US English. You can configure a translations.yaml file to override these labels, accomplishing the following goals:
- Adjust the UI text to better suit your project (for example, change "Login" to "Sign in").
- Change the language used in the UI, without adding a language picker.
To change the built-in UI labels:
- Add a
translations.yamlfile to the root of your project. - Copy and paste the l10n translation keys to the file.
- Add your customized values for the translation keys.
- Commit your changes.
The following is an example translations.yaml file that if included in the root of your project, changes the label of the login button to "Sign in":
userMenu.login: Sign inAlternatively, you can change the labels in the default UI components, by ejecting the components you want to change.
Your browser's developer tools can help you identify which translation keys to use. These tools allow you to inspect HTML elements and see which translation keys are applied.
To find translation keys using browser developer tools:
- Right-click the page element that you want to find the translation key for and click Inspect element. The browser opens developer tools with the element highlighted in the Elements tab.
- In the code of the highlighted element, locate the
data-translation-keyproperty. The translation key is the value of thedata-translation-keyproperty. In some cases you might need to drill down the code nested in the selected element.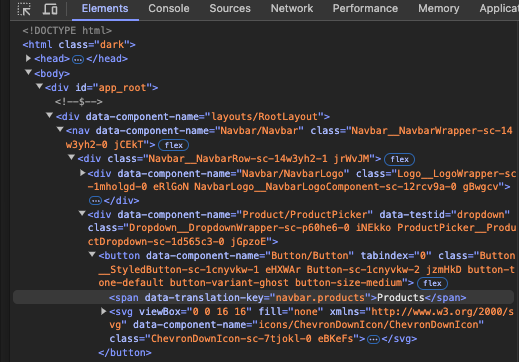
Now you can add the key to the translations.yaml file and use it to localize or customize your project.
- Localization configuration - Configure language support, default locales, and localization behavior for your multi-language project
- Localize content files - Translate your documentation content into multiple languages with proper file organization and structure